WHO/Food Add./24.65
FAO Nutrition Meetings
Report Series No. 38A
SPECIFICATIONS FOR IDENTITY AND
PURITY AND TOXICOLOGICAL EVALUATION
OF SOME ANTIMICROBIALS AND
ANTIOXIDANTS
The content of this document is the result of the deliberations of the
Joint FAO/WHO Expert Committee on Food Additives which met 8-17
December 1964a
a Eighth Report of the Joint FAO/WHO Expert Committee on Food
Additives, Wld Hlth Org. techn. Rep. Ser., 1965, 309; FAO
Nutrition Meetings Report Series 1965, 38.
APPENDIX A
METHODS
1. Loss on drying
If the sample is in the form of large crystals, reduce the particle
size to approximately 2 mm, crushing quickly to avoid gain or loss of
moisture. Take a glass-stoppered, shallow weighing bottle that has
been dried for 30 minutes under the same conditions as will be
employed in the determination. Put 1-2 g of the well-mixed sample in
the bottle, replace the cover and weigh the bottle and the sample
accurately. Distribute the sample as evenly as practicable to a depth
of about 5 mm, and not more than 10 mm in the case of bulky materials.
Place the bottle with its contents in the drying chamber, dry the
sample at the temperature and for the time specified in the mnograph.
Upon opening the chamber, close the bottle promptly and allow it to
come to room temperature in a desiccator before weighing.
If the substance melts at a lower temperature than that specified for
the determination of loss on drying, prepare the sample as described
above, then place it in a vacuum desiccator containing a suitable
desiccant, such as anhydrous calcium chloride, magnesium perchlorate,
phosphorus pentoxide, or silica gel. Evacuate the desiccator to a
pressure at least as low as that obtained by an efficient aspirating
water pump and maintain this vacuum for the time specified in the
monograph. Then weigh the dried sample.
2. Total ash
Heat a porcelain or platinum dish until dull red, allow to cool and
weigh. Weigh accurately a quantity suitable for the substance
(between 2.00 g and 10.00 g) in the dish, spread the substance in a
fine layer and place it in a suitable opening of an asbestos plate.
Allow to cool when the carbon has completely disappeared and weigh.
Repeat heating until the difference is not more than 0.2 mg. If at
the indicated temperature carbon cannot be completely oxidized, allow
to cool, warm the carbonized mass with water and filter the extract
through an ashless filter-paper, wash the filter with some water,
transfer the filter to the dish, dry and ignite. Allow to cool,
transfer the filtrate to the dish, evaporate, heat for a very short
time to below dull red, allow to cool and weigh. Repeat this heating
until the difference in weight is not more than 0.2 mg.
weight of residue in dish
% total ash = × 100
weight of sample
3. Sulfated ash
Weigh 1.000 to 2.000 g of the substance in a tared crucible. Ignite
until thoroughly charred, cool, then moisten the residue with 1 ml of
sulfuric acid and cautiously ignite until the carbon is completely
consumed. Conduct the ignition in a place protected from air
currents, and use as low a temperature as possible to effect the
combustion of the carbon. When the carbon has completely disappeared,
cool the crucible in a desiccator and weigh.
4. Melting range
Spread a small quantity of the finely powdered substance in a thin
layer and dry at a temperature below its melting temperature, or in a
vacuum desiccator over sulfuric acid for 24 hours.
Transfer a quantity of the dried powder to a dry capillary-tube
(thickness of the wall, 0.10-0.15 mm; internal diameter, 0.9-1.1 mm)
and pack the powder by tapping the tube on a hard surface so as to
form a tightly packed column 2-4 mm in height. Attach the
capillary-tube and its contents to a standard thermometer so that the
closed end is at the level of the middle of the bulb and heat in a
suitable apparatus containing an appropriate liquid (liquid paraffin
or silicone oil) and fitted with a stirring device and an auxiliary
thermometer. Regulate the rise in temperature during the first period
to 3° per minute. When the temperature has risen to 5° below the
lowest figure of the range for the substance being tested, heat more
slowly; if no other directions are given, the rate of rise in
temperature should be 1°-2° per minute.
Unless otherwise directed, read the temperature at which the substance
is observed to form droplets against the side of the tube and the
temperature at which it is completely melted, as indicated by the
formation of a definitive meniscus.
To the temperature readings, apply the emergent-stem correction
determined as follows:
Before starting the determination of the melting range, adjust the
auxiliary thermometer so that the bulb touches the standard
thermometer at a point midway between the graduation for the expected
melting range and the surface of the heating material. When the
substance has melted read the temperature on the auxiliary
thermometer. Calculate the correction to be added to the temperature
reading of the standard thermometer from the following formula:
0.00015 N(T -t)
where T is the temperature reading of the standard thermometer;
t is the temperature reading of the auxiliary thermometer;
N is the number of degrees of the scale of the standard
thermometer between the surface of the heating material and
the level of the mercury.
The statement "melting range, a°-b°" means that the corrected
temperature at which the material is observed to form droplets must be
at least a° and that the material must be completely melted at the
corrected temperature b°.
5. Saponification value
Determine the number of mg of potassium hydroxide required to saponify
1 g of the sample.
Melt the sample if it is not already liquid and filter through
filter-paper to remove any impurities and the last traces of moisture.
The sample must be completely dry. Weigh a sample of such size that
the back titration is 45-55% of the blank. This is usually 4-5 g.
Add 50 ml of ethanolic potassium hydroxide TS from a pipette and allow
the pipette to drain for a definite period of time. Prepare and
conduct blank determinations simultaneously with the sample and
similar in all respects. Connect the air condenser and boil gently
but steadily until the sample is completely saponified. This usually
requires about 1 hour for normal samples. After the flask and
condenser have cooled somewhat but not sufficiently for the contents
to gel, work down the inside of the condenser with a little distilled
water. Disconnect the condenser, add about 1 md of phenolphthalein TS
and titrate with 0.5 N HCl until the pink colour has just
disappeared.
56.1 × N (A-B)
Saponification value =
W
where A = ml of HCl required for titration of the blank;
B = ml of HCl required for titration of the sample;
W = weight of sample;
N = normality of the HCl.
6. Solidification point
Scope
This method is designed to determine the solidification point of food
grade chemicals having appreciable heats of fusion. It is applicable
to chemicals having solidification points between -20° and +150°.
Solidification point is an empirical constant defined as the
temperature at which the liquid phase of a substance is in approximate
equilibrium with a relatively small portion of the solid phase. It is
measured by noting the maximum temperature reached during a controlled
cooling cycle after the appearance of a solid phase.
Solidification point is distinguished from freezing point in that the
latter term applies to the temperature of equilibrium between the
solid and liquid state depending upon the crystal form of the solid
which is present.
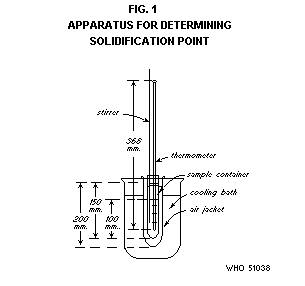
Apparatus
The apparatus is illustrated in Figs. 1 and 2 and consists of the
components described in the following paragraphs.
Thermometer. A thermometer having a range not exceeding 30°,
graduated in 0.1° divisions, and calibrated for 76 mm immersion,
should be employed. A satisfactory series of thermometers, covering a
range from -20° to +150° is available as ASTM-EI 89C through 96C. A
thermometer should be so chosen that the solidification point is not
obscured by the cork stopper of the sample container.
Sample container. Use a standard glass 25 × 150 mm test-tube with
lip, fitted with a cork or rubber stopper bored with a hole into which
the sample container can easily be inserted up to the lip.
Cooling bath. Use a 2-litre beaker or similar suitable container as
a cooling bath. Fill it with an appropriate cooling medium such as
glycerine, mineral oil, water, water and ice or alcohol-dry ice.
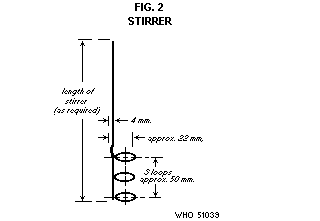
Stirrer. The stirrer consists of a 1-mm diameter (B and S gauge 18)
corrosion-resistant wire bent in a series of 3 loops about 25 mm
apart. It should be made so that it will move freely in the space
between the thermometer and the inner wall of the sample container.
The shaft of the stirrer should be of a convenient length designed to
pass loosely through a hole in the cork holding the thermometer.
Stirring may be hand-operated or mechanically activated at 20 to 30
strokes per minute.
Assembly. Assemble the apparatus in such a way that the cooling
bath can be heated or cooled to control the desired temperature
ranges. Clamp the air jacket so that it is held rigidly just below the
lip and immerse it in the cooling bath to a depth of 160 mm.
Preparation of sample
The solidification point is usually determined on chemicals as they
are received. Some may be hygroscopic, however, and require special
drying. Where this is necessary it will be noted in the monograph.
Products which are normally solid at room temperature must be
carefully melted at a temperature about 10° above the expected
solidification point. Care should be observed to avoid heating in
such a way as to decompose or distil any portion of the sample.
Procedure
Adjust the temperature of the cooling bath to about 5° below the
expected solidification point. Fit the thermometer and stirrer with a
cork stopper so that the thermometer is centred and the bulb is about
20 mm from the bottom of the sample container. Transfer a sufficient
amount of the sample, previously melted if necessary, into the sample
container to fill it to a depth of about 90 mm when in molten state.
Place the thermometer and stirrer in the sample container and adjust
the thermometer so that the immersion line will be at the surface of
the liquid add the end of the bulb 20 ± 4 mm from the bottom of the
sample container. When the temperature of the sample is about 5°
above the expected solidification point, place the assembled sample
tube in the air jacket.
Allow the sample to cool while stirring at the rate of 20 to 30
strokes per minute, in such a manner that the stirrer does not touch
the thermometer. Stir the sample continuously during the remainder of
the test.
The temperature at first will gradually fall, then become constant as
crystallization starts and continues under equilibrium conditions, and
finally will start to drop again. Some chemicals may supercool
slightly below (0.5°) the solidification point; as crystallization
begins the temperature will rise and remain constant as equilibrium
conditions are established. Other products may cool more than 0.5°
and cause deviation from the normal pattern of temperature changes.
If the temperature rise exceeds 0.5° after the initial
crystallization, repeat the test and seed the melted compound with
small crystals of the sample at 0.5° intervals as the temperature
approaches the expected solidification point. Crystallization for
seeding may be obtained by freezing a small sample in a test-tube
directly in the cooling bath. It is preferable that seeds of the
stable phase be used from a previous determination.
Observe and record the temperature readings at regular intervals until
the temperature rises from a minimum due to supercooling to a maximum
and then finally drop. The maximum temperature reading is the
solidification point. Readings 10 seconds apart should be taken in
order to establish that the temperature is at a maximum level and
continues until the drop in temperature is established.
7. Limit test for arsenic
Preparation of samples
A. Transfer 3.5 g of formic acid
o-phenylphenol
sodium o-phenylphenol
thiodipropionic acid
dilauryl thiodipropionate
into the generator flask, add 5 ml of sulfuric acid and a few glass
beads and digest on a hot plate in a fume hood until charring begins
(additional sulfuric acid may be necessary to wet completely some
samples, but the total volume added should not exceed about 10 ml).
After the sample has been initially decomposed by the acid add with
caution, dropwise, 30% hydrogen peroxide, allowing the reaction to
subside and reheating between drops. The first few drops must be
added very slowly with sufficient mixing to prevent a rapid reaction,
and heating should be discontinued if foaming becomes excessive.
Maintain oxidizing conditions at all times during the digestion by
adding small quantities of the peroxide whenever the mixture turns
brown or darkens. Continue the digestion until the organic matter
is destroyed, fumes of sulfuric acid are copiously evolved, and the
solution becomes colourless. Cool, and cautiously add 10 ml of water,
again evaporate to strong fuming, and cool. Add 10 ml of water, wash
the sides of the flask with a few ml of water and dilute to 35 ± 2 ml.
B. Use 3.5 g of potassium nitrate or
sodium nitrate
and dissolve in about 20 ml of water, add 5 ml of sulfuric acid and
evaporate to strong fumes of sulfur trioxide. Cool, wash the sides of
the container with water and heat again to strong fumes. Repeat the
washing and fuming 3 more times and cool. Add 10 ml. of stannated
hydrochloric acid TS and dilute to 60 ml with water.
C. Use 3.5 g of potassium nitrite or
sodium nitrite
and dissolve in about 15 ml of dilute sulfuric acid TS, boil gently
for 1 minute and cool. Add 10 ml of stannated hydrochloric acid TS
and dilute to 60 ml with water.
Preparation of standard solution of arsenic
To 50 ml of water add 10 ml of stannated hydrochloric acid TS and 1 ml
of dilute arsenic TS. The resulting solution, when treated as
described in the procedure below, yields a stain on the mercuric
chloride paper referred to as the standard stain.
Procedure
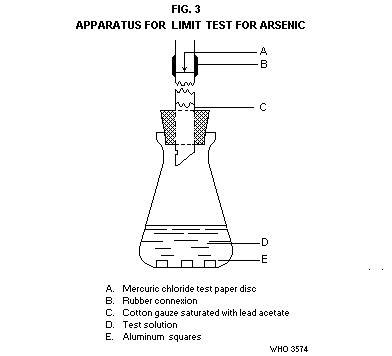
Transfer the solution to a conical flask of 120-ml capacity (Fig. 3).
The flask is fitted with a rubber stopper through which passes a glass
tube, 200 mm long and with an internal diameter of 6.5 mm. The lower
end of the glass tube is cut at an angle and a hole not less than 2 mm
in diameter is blown in the side of the tube. About 40 mm above the
stopper the tube is cut cleanly and squarely into 2 parts; between the
2 parts of the tube is inserted a small disc of test paper, having a
diameter equal to the outside diameter of the tube. The 2 parts of
the tube with the test paper are tightly joined together with a rubber
tubing. The test paper circle in made from filter-paper soaked in a
5% solution of mercuric chloride in ethanol and dried in a current of
air. Loosely plug the lower end of the tube with cotton gauze soaked
in a 5% lead acetate solution and dry. In the conical flask add 3
squares (8 mm × 8 mm × 1 mm) of aluminium sheet and immediately close
the flask with the rubber stopper. Allow the flask to stand in a
water bath at 25° for 45 minutes.
At the same time carry out a parallel experiment using the standard
solution of arsenic in place of the test sample. Compare the colours
of the two mercuric chloride test papers. The intensity of the colour
from the test sample should not be greater than that of the standard
stain.
Note: All reagent used in the limit test for arsenic should be pure
with respect to arsenic.
8. Limit test for lead
Preparation of the sample
A. Dissolve 1.0 g of potassium nitrate
sodium nitrate
potassium nitrite
sodium nitrite
in 20 ml of water and neutralize to phenolphthalein TS.
B. Transfer 1.0 g of diphenyl
o-phenylphenol
dilauryl thiodipropionate
sodium o-phenylphenol
into a 100-ml Kjeldahl or other suitable flask, add 3 ml of nitric
acid, then add cautiously in divided portions 3 ml of sulfuric acid.
If the sample is not completely digested by the foregoing procedure
another 1.0 g should be taken, and double the quantity of nitric acid
and sulfuric acid added to effect the digestion.
Place the flask on an asbestos board having a 5-cm hole in the centre
and warm slightly with a small flame. Discontinue heating if foaming
becomes excessive. When the reaction has quietened, heat cautiously,
rotating the flask occasionally to prevent the sample from caking on
the glass exposed to the flame. Maintain oxidizing conditions at all
times during the digestion by adding small quantities of nitric acid
whenever the mixture turns brown or darkens. Continue the digestion
until the organic matter is destroyed, fumes of sulfuric acid are
copiously evolved and the solution becomes colourless or retains only
a light straw colour. Cool, add cautiously 10 ml of water and again
evaporate until there is a copious evolution of fumes, repeating if
necessary to remove all the nitric acid. Cool, dissolve the residual
liquid in about 10 ml of water, wash the neck of the flask with a few
ml of water and add 10 ml of stannated hydrochloric acid TS. Dilute
the solution to 20 ml and neutralize it to phenolphthalein TS.
Procedure
To a 100-ml separating funnel add 10 ml of 0.2 N ammonia, 5 ml of a
5% solution of ammonium citrate (adjusted to pH 8.5) and 2 ml of a 10%
solution of potassium cyanide and mix thoroughly. To this solution
add 2 ml of dithizone-carbon-tetrachloride solution (20 mg/l). Shake
the separating funnel for a few minutes and discard the carbon
tetrachloride layer. Add the sample as prepared above to the
separating funnel. The pH of the solution should be about 10 (test
with thymol blue paper). Again add 2 ml of the carbon tetrachloride
solution of dithizone and shake vigorously for a few minutes. The
carbon tetrachloride layer becomes red if lead is present. Depending
upon whether the limits for the substance are 5 or 10 mg/kg, compare
the colour with that of the standard solutions containing 5 or 10 mcg
of lead treated in the same manner. Finally separate the carbon
tetrachloride layer obtained from the test and shake it with 10 ml of
a buffer pH 2 TS. The red colour will disappear if due to lead.
9. Limit test for heavy metals
This is an empirical "catch-all" test for the following heavy metals
in addition to lead: mercury, cadmium, antimony, arsenic (partial),
silver, copper and certain others. All these metals give a colour
with hydrogen sulfide and the test is designed to demonstrate that the
total amounts present, expressed in terms of lead, do not exceed the
heavy metal limits laid down in the various monographs. Zinc and tin
also form sulfides and although these are not coloured at the pH of
the test (3-4) they may influence the test to some degree. The test
is useful in indicating the presence of heavy metals impurities in a
raw material from a new source and in detecting accidental
contamination of which the manufacturer might otherwise be unaware.
It also provides confirmation of good manufacturing practice.
However, if the method of manufacture or the grade of raw materials
employed gives reason to believe that an impurity such as mercury or
cadmium may be present, a specific test for the impurity in question
should be employed.
Preparation of sample solutions
See individual monographs.
Preparation of standard lead solution
Pipette into a 50-ml Nessler tube a volume of standard lead solution
containing the quantity of lead (Pb) equivalent to the heavy metals
limit specified for the substance to be tested and dilute to 25 ml.
Adjust the pH of the solution to 3-4 by addition of dilute ammonia TS
or acetic acid, whichever is necessary, and dilute with water to 40
ml.
Preparation of the test solution
Place in a 50-ml Nessler tube matching the one used for the standard
lead solution 25 ml of the sample solution prepared as directed in the
individual monographs. Check the pH of the solution and if necessary
adjust it to 3-4 by the addition of dilute ammonia TS, dilute
hydrochloric acid TS, or acetic acid. Dilute to 40 ml with water.
Colour reaction
Add 10 ml of hydrogen sulfide solution TS to each Nessler tube, mix,
allow to stand for 10 minutes, then view downwards over a white
surface. The colour of the test solution should not be darker than
that of the standard lead solution.
10. Distillation range
Definitions
Distillation range. The difference between the temperature observed
at the start of a distillation and that observed at which a specified
volume has distilled, or at which the dry point is reached.
Initial boiling point. The temperature indicated by the
distillation thermometer at the instant the first drop of condensate
leaves the end of the condenser tube.
Dry Point. The temperature indicated at the instant the last drop
of liquid evaporates from the lowest point in the distillation flask,
disregarding any liquid on the side of the flask.
Apparatus
Distillation flask. A 200-ml round-bottomed distillation flask of
heat-resistant glass is preferred when sufficient sample (in excess of
100 ml) is available for the test. If a sample of less than 100 ml
must be used, a smaller flask having the capacity of at least double
the volume of the liquid taken may be employed. The 200-ml flask has
a total length of 17.9 cm, and the inside diameter of the neck is 2.1
cm. Attached about midway in the neck, approximately 12 cm from the
bottom of the flask, is a side arm 12.7 cm long and 5 mm in internal
diameter, which is inclined downward at an angle of 75° from the
vertical.
Condenser. Use a straight glass condenser of heat-resistant tubing,
56 to 60 cm long and equipped with a water jacket so that about 40 cm
of the tubing is in contact with the cooling medium. The lower end of
the condenser may be bent to provide a delivery tube or it may be
connected to a bent adapter which serves as the delivery tube.
Note: All-glass apparatus with standard-taper ground joints may be
used alternatively if the assembly employed provides results equal to
those obtained with the flask and condenser described above.
Receiver. The receiver is a 100-ml cylinder which is graduated in
1-ml sub-divisions and calibrated "to contain". It is used for
measuring the sample as well as for receiving the distillate.
Thermometer. An accurately standardized partial immersion
thermometer having the smallest practical sub-divisions (not greater
than 0.2°C) is recommended in order to avoid the necessity for an
emergent-stem correction. Suitable thermometers are available such as
the ASTM Series 34C through 41C and 102C through 107C, or as the MCA
types R-1 through R-4.
Source of heat. A Bunsen burner is the preferred source of heat.
An electric heater may be used, however, if it is shown to give
results comparable to those obtained with the gas burner.
Shield. The entire burner and flask assembly should be protected
from external air currents. Any efficient shield may be employed for
this purpose.
Flask support. An asbestos board, ¨ inch in thickness and having a
4-inch circular hole, is placed on a suitable ring or platform support
and fitted loosely inside the shield to ensure that hot gases from the
source of heat do not come in contact with the sides or neck of the
flask. A second ¨-inch asbestos board, at least 6 inches square and
provided with a ¨-inch circular hole, is placed on top of the first
board. This board is used to hold the 200-ml distillation flask which
should be fitted firmly on the board so that direct heat is applied to
the flask only through the opening in the board.
Procedure
Note: This procedure is to be used for liquids which distil above
50° wherein the sample can be measured and received, and the condenser
water used, at room temperature (20°-30°). For materials boiling
below 50°, cool the liquid to below 10° before sampling, receive the
distillate in a water bath cooled to below 10° and use water cooled to
below 10° in the condenser.
Measure 100 ± 0.5 ml of the liquid in the 100-ml graduate and transfer
the sample together with an efficient antibumping device to the
distilling flask. Do not use a funnel in the transfer, or allow any
of the sample to enter the side arm of the flask. Place the flask on
the asbestos boards which are supported on a ring or platform, and
place in position the shield for the flask and burner. Connect the
flask and condenser, place the graduate under the outlet of the
condenser tube and insert the thermometer. The thermometer should be
located in the centre of the neck end so that the top of the bulb
(when present, auxiliary bulb) is just below the bottom of the outlet
to the side arm. Regulate the heating so that the first drop of
liquid is collected within 5 to 10 minutes. Read the thermometer at
the instant the first drop of distillate falls from the end of the
condenser tube and record as the initial boiling point. Continue the
distillation at the rate of 4 or 5 ml of distillate per minute, noting
the temperature as soon as the last drop of liquid evaporates from the
bottom of the flask (dry point) or when the specified percentage has
distilled over. Correct the observed temperature readings for any
variation in the barometric pressure from the normal (760 mm) by
allowing 0.1° for each 2.7 mm of variation, adding the correction if
the pressure is lower or subtracting if higher than 760 mm. When a
total immersion thermometer is used correct for the temperature of the
emergent-stem by the formula 0.00015 T(T - t), in which N
represents the number of degrees of emergent-stem from the bottom of
the stopper, T the observed temperatures of distillation, and t the
temperature registered by an auxiliary thermometer the bulb of which
is placed midway of the emergent-stem, adding the correction to the
observed readings of the main thermometer.
APPENDIX B
TEST SOLUTIONS
Acetic acid TS: A solution containing approximately 30% w/v of
CH3OOH in water (approximately 5 N).
Acetic acid, dilute TS: Acetic acid TS diluted with water to contain
approximately 6% w/v of CH3OOH (approximately N).
Ammonia TS: A solution containing between 9.5% and 10.5% of NH3.
Prepare by diluting 400 ml of ammonium hydroxide (28%) with sufficient
water to make 1000 ml.
Ammonia dilute TS: A solution containing approximately 10% of NH3 in
water (approximately 6 N).
Arsenic dilute TS: Mix 1 ml of arsenic, strong, TS with sufficient
water to produce 100 ml. The dilute solution of arsenic must be
freshly prepared. 1 ml contains 0.00001 g of arsenic.
Arsenic, strong, TS: Dissolve 0.132 g of arsenic trioxide in 50.0 ml
of hydrochloric acid (a 25% w/v solution of HCl in water) and add
sufficient water to produce 100.0 ml.
Bromide-bromate TS: (Equal 0.1 N bromine) (7.991 g Br per litre)
Dissolve 3 g of potassium bromate, KBrO3, and 15 g of potassium
bromide, KBr, in sufficient water to make 1000 ml and standardize the
solution as follows: Transfer about 25 ml of the solution, accurately
measured, into a 500-ml iodine flask and dilute with 120 ml of water.
Add 5 ml of hydrochloric acid, stopper the flask and shake it gently.
Then add 5 ml of potassium iodide TS, re-stopper, shake the mixture,
allow it to stand for 5 minutes and titrate the liberated iodine with
0.1 N sodium thiosulfate, adding starch TS near the end of the
titration. Calculate the normality. Store this solution in dark
amber coloured, glass-stoppered bottles.
Buffer pH 2 TS: Combine 11.90 ml of 0.2 M hydrochloric acid and 88.10
ml of 0.2 M potassium chloride in 200-ml volumetric flask and add
water to volume.
Ethanolic potassium hydroxide TS: Place a few g (5 to 10) of
potassium hydroxide in a 2-litre flask, add 1 to 1.5 litres of 95%
ethanol and boil on a water bath under reflux condenser for 30 to 60
minutes. Distil and collect the ethanol. Dissolve 40 g of potassium
hydroxide, low in carbonate, in 1 litre of the distilled ethanol
keeping the temperature below 15.5° while the alkali is being
dissolved. This solution should remain clear.
p-ethoxychrysoidin TS: Dissolve 50 mg of p-ethoxychrysoidin
monohydrochloride in a mixture of 25 ml of water and 25 ml of alcohol,
add 3 drops of hydrochloric acid, stir vigorously and filter, if
necessary, to obtain a clear solution.
Ferric chloride TS: Dissolve 9 g of ferric chloride, FeCl3.6H2O, in
sufficient water to make 100 ml.
Hydrochloric acid, dilute, TS: Mix 260 ml of hydrochloric acid (25%
w/v solution of HCl in water) with sufficient water to produce 1000 ml
(approximately 2 N).
Hydrochloric acid, stannated, TS: Mix 1 ml of a solution of stannous
chloride TS with 100 ml of hydrochloric acid (a 25% w/v solution of
HCl in water).
Hydrogen sulfide TS: A saturated solution of hydrogen sulfide made by
passing H2S into cold water. Store it in small, dark, amber-coloured
bottles, filled nearly to the top. It is unsuitable unless it
possesses a strong odour of H2S, and unless it produces at once a
copious precipitate of sulfur when added to an equal volume of ferric
chloride TS. Store in a cold dark place.
Methylene blue TS: Dissolve 125 mg of methylene blue in 100 ml of
alcohol and dilute with alcohol to 250 ml.
Lead standard TS: Dissolve 0.1598 g of lead nitrate [Pb (NO3)2] in
water to which has been added 1 ml of nitric acid and dilute to 1000
ml. Then dilute 10 ml of this solution to 100 ml. Each ml contains
0.01 mg of lead. This solution must be freshly prepared.
Methyl red TS: Dissolve 100 mg of methyl red in 100 ml of alcohol and
filter if necessary.
Methyl red-methylene blue TS: Add 10 ml of methyl red TS to 10 ml of
methylene blue TS and mix.
Nitrite standard TS: Dissolve 1.5 g of sodium nitrite (NaNO2) in 1
litre of carbon dioxide- and ammonia-free water. Each ml of this
solution contains 1 mg NO2.
Phenolphthalein TS: Dissolve 0.2 g of phenolphthalein (C20H14O4) in
60 ml of 90% ethanol and add a sufficient quantity of water to produce
100 ml.
Potassium iodide TS: Dissolve 16.5 g of potassium iodide, KI, in
water to make 100 ml. Store in light-resistant containers.
Sodium bitartrate TS: Dissolve 1 g of sodium bitartrate
NaHC4H4O6.H2O in water to make 100 ml. Prepare this solution
fresh.
Sodium hydroxide TS: Dissolve 4.3 g of sodium hydroxide in water to
make 100 ml (approximately N.
Starch TS: Triturate 1 g of arrowroot starch with 10 ml of cold water
and pour slowly, with constant stirring, into 200 ml of boiling water.
Boil the mixture until a thin, transparent fluid is obtained (longer
boiling than necessary renders the solution less sensitive). Allow to
settle and use only the clear super-natant liquid. Prepare this
solution fresh.
Sulfuric acid, dilute TS: Mix 57 ml of sulfuric acid (H2SO4,
approximately 90% w/v) with sufficient water to produce 1000 ml
(approximately 2 N).
Uranyl zinc acetate TS: Dissolve 10 g of uranyl acetate
[(CH3COO)2UO2.2H2O] by heating with 50 ml of water and 5 ml of
acetic acid (a solution containing approximately 30% w/v of CH2COOH,
in water, approximately 5 N). Dissolve 30 g of zinc acetate
[(CH3COO)2Zn.2H2O] by heating with 30 ml of water and 3 ml of
acetic acid. Mix the two solutions, allow to cool to room temperature
and remove by filtration any solid material which separates.